 |
 |
 |
| Home | More Articles | Join as a Member! | Post Your Job - Free! | All Translation Agencies |
|
|||||||
|
|
How to Format in Ms. Word
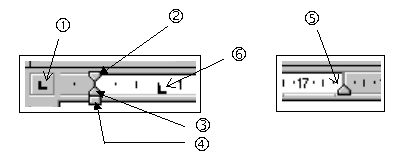
Or what if the customer decided to change the margin sizes of the document, or used a different sized paper than you do? Such small adjustments to the document could have profound affects on how the document will appear before printing. The proper way to indent is explained in the Ruler Bar section below. These instructions were originally written for Word 6.0 but generally apply to older versions. I have been regularly upgrading my Word because I need it for my Translation Agency, but I prefer to use Word 97, because it opens faster, and I detest two qualities of later versions: separate instances of Word are created when I have more than one document open; and a special window opens whenever I press CTRL+C twice in a row (I frequently copy/paste, and I like to press copy twice as a nervous twitch because I'm a computer geek and do not want to accidentally paste the previous contents copied to the clipboard). Customize Your ToolbarYou can customize word so that it best suits your needs. When you have a file open (press CTRL N to open a new file), you can access VIEW ? TOOLBARS to choose which toolbars you want shown. You can also customize or create your own toolbars. To customize a visible toolbar, access TOOLS ? CUSTOMIZE ? TOOLBARS and then proceeed to drag off any icons you do not want shown in your toolbar, dragging any icons you do want into your chosen toolbar from the Customize window. If you are not sure what a certain icon does, you can click on it in the Customize window and read the description below. When this Customize window is open, you can also move the various icons within the toolbar, separating some from others in the process. Below is shown the toolbars we have customized for ourselves with an explanation of each icon. 1 opens a new file The Ruler BarNow that you have prepared your toolbar(s), you can start working in your document. The ruler is an effective way to perform special formatting in a paragraph.
By double clicking with the mouse into the ruler, you can add or delete tab stops (to delete, drag the tab stop off the ruler). Icon "1" changes the alignment of how text lines up under a
certain tab stop, which can be left, center, right or decimal. Jump to
the next tab stop within a paragraph by pressing TAB. You can also move points "1", "2" or both using short-cut keys, such as CTRL T to move point "2" to the right, CTRL SHIFT T to move point "2" to the left, CTRL M to move both points "1" and "2" to the right and CTRL SHIFT M to move both of these points to the left. If you have tab stops set on your ruler, using these short-cut keys will jump points "1" and/or "2" to the next or previous tab stop. If there are no tab stops, these points will jump at a distance as determined in the default tab stop distance (set by accessing FORMAT ? TABS). By accessing FORMAT ? TABS, you can also set the exact distance of individual tab stops and set any leading dotted lines etc. before them. Paragraph FormattingOnce you have labouriously set a format for a particular paragraph (for by example using the Ruler Bar), you can give it a style name by dragging over the existing style name (in the style box icon "20" as shown in the toolbar above) and then typing over it with a name you choose. Accessing any of the shown style names while you have the cursor in any paragraph or while any number of paragraphs are selected will change the format of that or those paragraphs to the format of the style you choose. If you do not want to create a style but rather only copy the formatting of a particular selected paragraph, you can press CTRL SHIFT C to copy the format and then paste the copied format by pressing CTRL SHIFT V to apply to a subsequent paragraph where you reposition the cursor (or subsequent selected paragraphs). Note that if you select only a word or a couple of words, CTRL SHIFT C will only copy the formatting for the font. If you want to copy the formatting for the font as well as the paragraph, you must at least have selected the paragraph mark (seen as a backward P when activating icon "14" on the toolbars shown above) for that paragaph. Note that CTRL C copies something while CTRL SHIFT C copies the formatting of that something (CTRL X simultaneously erases while copying it - hence moving it). CTRL V pastes that something to where you subsequently place the cursor. Once you have set the formatting of a particular paragraph, all subsequent paragraphs that you place following this paragraph will continue with the same formatting. If you want to return to the original (normal) style that you started with, access the Normal style in the style box or press the short-cut key CTRL SHIFT N. If you want to change the Normal style (or any other style in a document), set the formatting for a particular paragraph, select it (including the paragraph mark at the end of the paragraph) and then select the Normal style (or any other style) in the style box icon. A window will then appear asking you whether you want to change the formatting of the style or if you want to return back to the previous formatting. Choose "redefine style". If you want to set what the Normal style will be (as well as any other formatting instructions such as font, margins etc) for all future documents that you open, access FILE ? OPEN, change the List of File Type to Document Templates, and then open NORMAL.DOT found under WINWORD\TEMPLATE, whereby changing any formatting for this file will set how all subsequent new files are formatted in the future. Working in a ParagraphYou can move the cursor quickly within a paragraph by pressing CTRL LEFT ARROW (moves to the beginning of a previous word), CTRL RIGHT ARROW (moves to the beginning of the next word), CTRL UP ARROW (moves the cursor to the beginning of the previous paragraph) or CTRL DOWN ARROW (to the beginning of the next paragraph). CTRL HOME returns the cursor to the beginning of the document and CTRL END to the end. Holding the SHIFT key while moving the cursor to another area of the document will select that portion between the cursor's final and starting location. You can also select rows in a document by pressing the left hand key on the mouse when the mouse arrow turns into a right pointing arrow on the left hand side of the text. With the mouse, you can select a word by double clicking it or a paragraph by triple clicking it. If you ever make a mistake, accessing EDIT ? UNDO or EDIT ? REDO or REPEAT will do as such for many steps. The short-cut keys for these steps are CTRL Z and CTRL Y. You can also use the icons "6" or "7" for undoing or redoing certain steps. TablesTables are very useful and often used in many documents. To insert a table, press icon "5" on the toolbar as shown above or access TABLE ? INSERT TABLE. You can specify the number of rows or columns you want in your table, or you can remember by tabbing past the end of a table will automatically create a new row. You can move between cells in a table by pressing TAB or SHIFT TAB. To place a tab stop within a table cell, you must press CTRL TAB. When in a cell, you can see a miniature ruler bar for that cell with which you can format a paragraph within a table cell in the same manner as any other paragraph. You can then change the dimension of a table or its cells by dragging its column boundaries (when holding the mouse cursor above these column boundaries, you will see how the mouse cursor changes to special arrows - then you drag the boundaries). If you want to drag the height of cells, you must do so by positioning the mouse cursor over the represented boundaries in the vertical ruler bar in Page Layout view, wait until you see the special arrows and then begin dragging. You can also drag boundaries for only certain cells by first selecting those cells before dragging the boundaries. Once you have formatted the dimensions of a table, you can also give the table borders or shading, accomplished by accessing FORMAT ? BORDERS AND SHADING or by accessing the Borders and Shading toolbar by pressing icon "16" on the toolbar above. Remember that such border and shading instructions will only affect those cells which you have selected. You can also convert text to a table or table to text
by first selecting the text or table and then choose Table > Convert
Text to Table (or Convert Table to Text, if a table is selected). When
converting text to a table, you can use the "Separate text at"
section to choose what character will be converted into a column barrier.
To see all the available characters within a section of text, such as
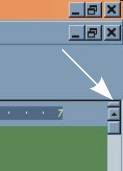
tabs or paragraph marks, you can press the Viewing a DocumentOnce you have completed a translation and performed some elementary formatting on its text, you can then view the file in Page Layout view for final formatting. Either access VIEW \ PAGE LAYOUT VIEW or press the small Page Layout view icon at the bottom left hand corner of the screen. Once in Page Layout view, you can see the page in Page Width view by pressing icon "11" or Whole Page view by pressing icon "12". These views are useful for final formatting of your document. In Page Layout view, you can view the vertical ruler bar and also manually change the page margins by positioning the mouse cursor over either end of one of the ruler bars until it turns into special arrows, dragging it elsewhere afterwards. Page margins can be set also by accessing FILE \ PAGE SETUP. Sometimes you might want to divide the view of a document into two sections, so that you can see two parts of a document at the same time (for example, when you are copy/pasting from one section to another, or need to refer to a particular section when translating in another). To do this (works in Excel and most programs), you will notice a small horizontal line above the right scroll bar.
Inserting a GraphicSometimes you might want to insert a graphic. For example, a customer sends you an original file in .pdf format (Adobe Acrobat Reader - which you can download from our Download Translation Programs pages), in which there are some fancy graphs or pictures which you want to show in your translated Word document. The easiest way to do this is to take a screen shot of the graphic by pressing the PrtSc (Print Screen) button on your keyboard (usually found at the top somewhere above F10). This copies what you see on your monitor to the Clipboard. You can zoom in or out in your PDF file so that your graphic fills up your screen nicely. You can also go to full screen mode (CTRL L), and then zoom mode (CTRL M) if the graphic is large and you need to do this for a better quality clip. Once you have copied a picture of the graphic to the clipboard, you want to crop it. For this you can use your favourite graphics program. Our favourite is IrfanView, which you can also download for free from our translation program download pages. To copy the clipboard into the program, have it running and simply press Paste (CTRL V). Select the section you want to crop with your mouse and then press CTRL Y. Now copy your cropped selection (CTRL C). This you can paste directly into Word. But you may want to paste this into a Text Box, so that you can position
the graphic anywhere on the page in your Word file. To insert a Text Box,
show the Graphics Toolbar (icon 17 above),
and then click on the TextBox icon You can also create other TextBoxes for actual text. For example, you can create a new TextBox, give it a white fill background, write in it some text, and position that over top of the original text in your graphic, as such positioning your translation of the text in the graphics overtop of the text. This way you can deliver the translation to your customer so that it looks very visual and professional. You will certainly impress them this way, and once you learn this technique, you will find it goes rather quickly. Auto TextSomething which can be quite useful for translating is Auto Text. For example, you might have some long name that takes time to write out, especially if it is in the original language you are translating from. Meaning you often have to first switch keyboards to the other language, then type out the name - which may require special characters in the other language and knowing off by heart where to find those characters on your physical keyboard, as those characters might not be etched onto your keys - and then switch back to your usual keyboard so that you can continue translating. A lot of work and time spent just to type out such a name, which may repeat itself a lot throughout your translation. For this AutoText can be quite useful. Go to Insert on the menu, and there you should find the Auto Text item with its shortcut keys. On my version of Windows the shortcut keys are F3 and ALT+F3, which you would use as follows. Select the word or words you want to make as an Auto Text (either by dragging over them with your mouse, double clicking on a single word, or by combination of CTRL SHIFT and left or right arrow). Once you have selected the word or words (even entire paragraphs or pages etc.) you want to create a shortcut for, press ALT+F3. A little window pops up asking what shortcut you want to assign it. This could be a single letter, or a selected short string of letters which you can easily remember. When you press OK and if you have already used that same shortcut for a previous translation in the past, you can either choose another shortcut, or just write over top of it (press OK), assuming you no longer need the previous shortcut you were using. Once you have set that up, the next time you want to write that word, words or paragraph etc., simply write out that shortcut, and then press F3. That shortcut will be immediately replaced by the word or words etc. you want to save yourself from typing out every time. Final Note and Other TipsNote that all short-cut keys for particular commands are displayed in the drop down menus (the menus you see displayed when you access for example FILE, EDIT etc.). You can also create your own short-cut keys by accessing TOOLS ? CUSTOMIZE ? KEYBOARD.
* * * * * *
Published - August 2010
E-mail this article to your colleague! Need more translation jobs? Click here! Translation agencies are welcome to register here - Free! Freelance translators are welcome to register here - Free! |
|
|
Legal Disclaimer Site Map |
 These
instructions were written as part of our
These
instructions were written as part of our 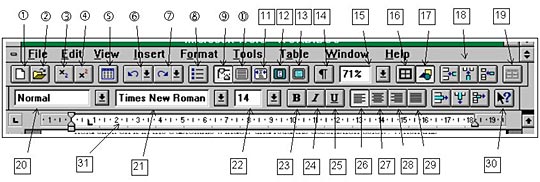
 Simply
hold your mouse over top of this horizontal line until the mouse arrow
turns into something else (should be a horizontal line with two arrows,
one pointing up, the other down). Once the arrow changes, press down with
your left mouse button and keep holding while you drag your mouse downwards,
as such creating a new pane for your file. You can resize the pane in
a similar manner any time. You can remove the ruler from either pane to
increase the text area. If you plan to frequently jump from pane to pane,
you can even create a shortcut key for this through the usual Tools >
Customize > Keyboard > select "Window and Help" in the
left window, and "OtherPane" in the right window. I like to
use CTRL F1 as a shortcut key for this, since I use ALT F1 to jump between
files.
Simply
hold your mouse over top of this horizontal line until the mouse arrow
turns into something else (should be a horizontal line with two arrows,
one pointing up, the other down). Once the arrow changes, press down with
your left mouse button and keep holding while you drag your mouse downwards,
as such creating a new pane for your file. You can resize the pane in
a similar manner any time. You can remove the ruler from either pane to
increase the text area. If you plan to frequently jump from pane to pane,
you can even create a shortcut key for this through the usual Tools >
Customize > Keyboard > select "Window and Help" in the
left window, and "OtherPane" in the right window. I like to
use CTRL F1 as a shortcut key for this, since I use ALT F1 to jump between
files.
